Why Elevation Drawings Are Essential For Your Interior Renovation or New Build Project
After a Floor Plan Design has been achieved for a project, and we’ve collected inspiration images and compiled a Vision Board (or one for each room) - we move on to developing the design and creating the aesthetic details of the new interior. One of the most important ways we communicate our design intent is through elevations. (If you’re designing your own project and you’ve never put together a Vision Board before stay tuned as I’ve created a step by step guide along with a drag & drop template which will be available soon.)
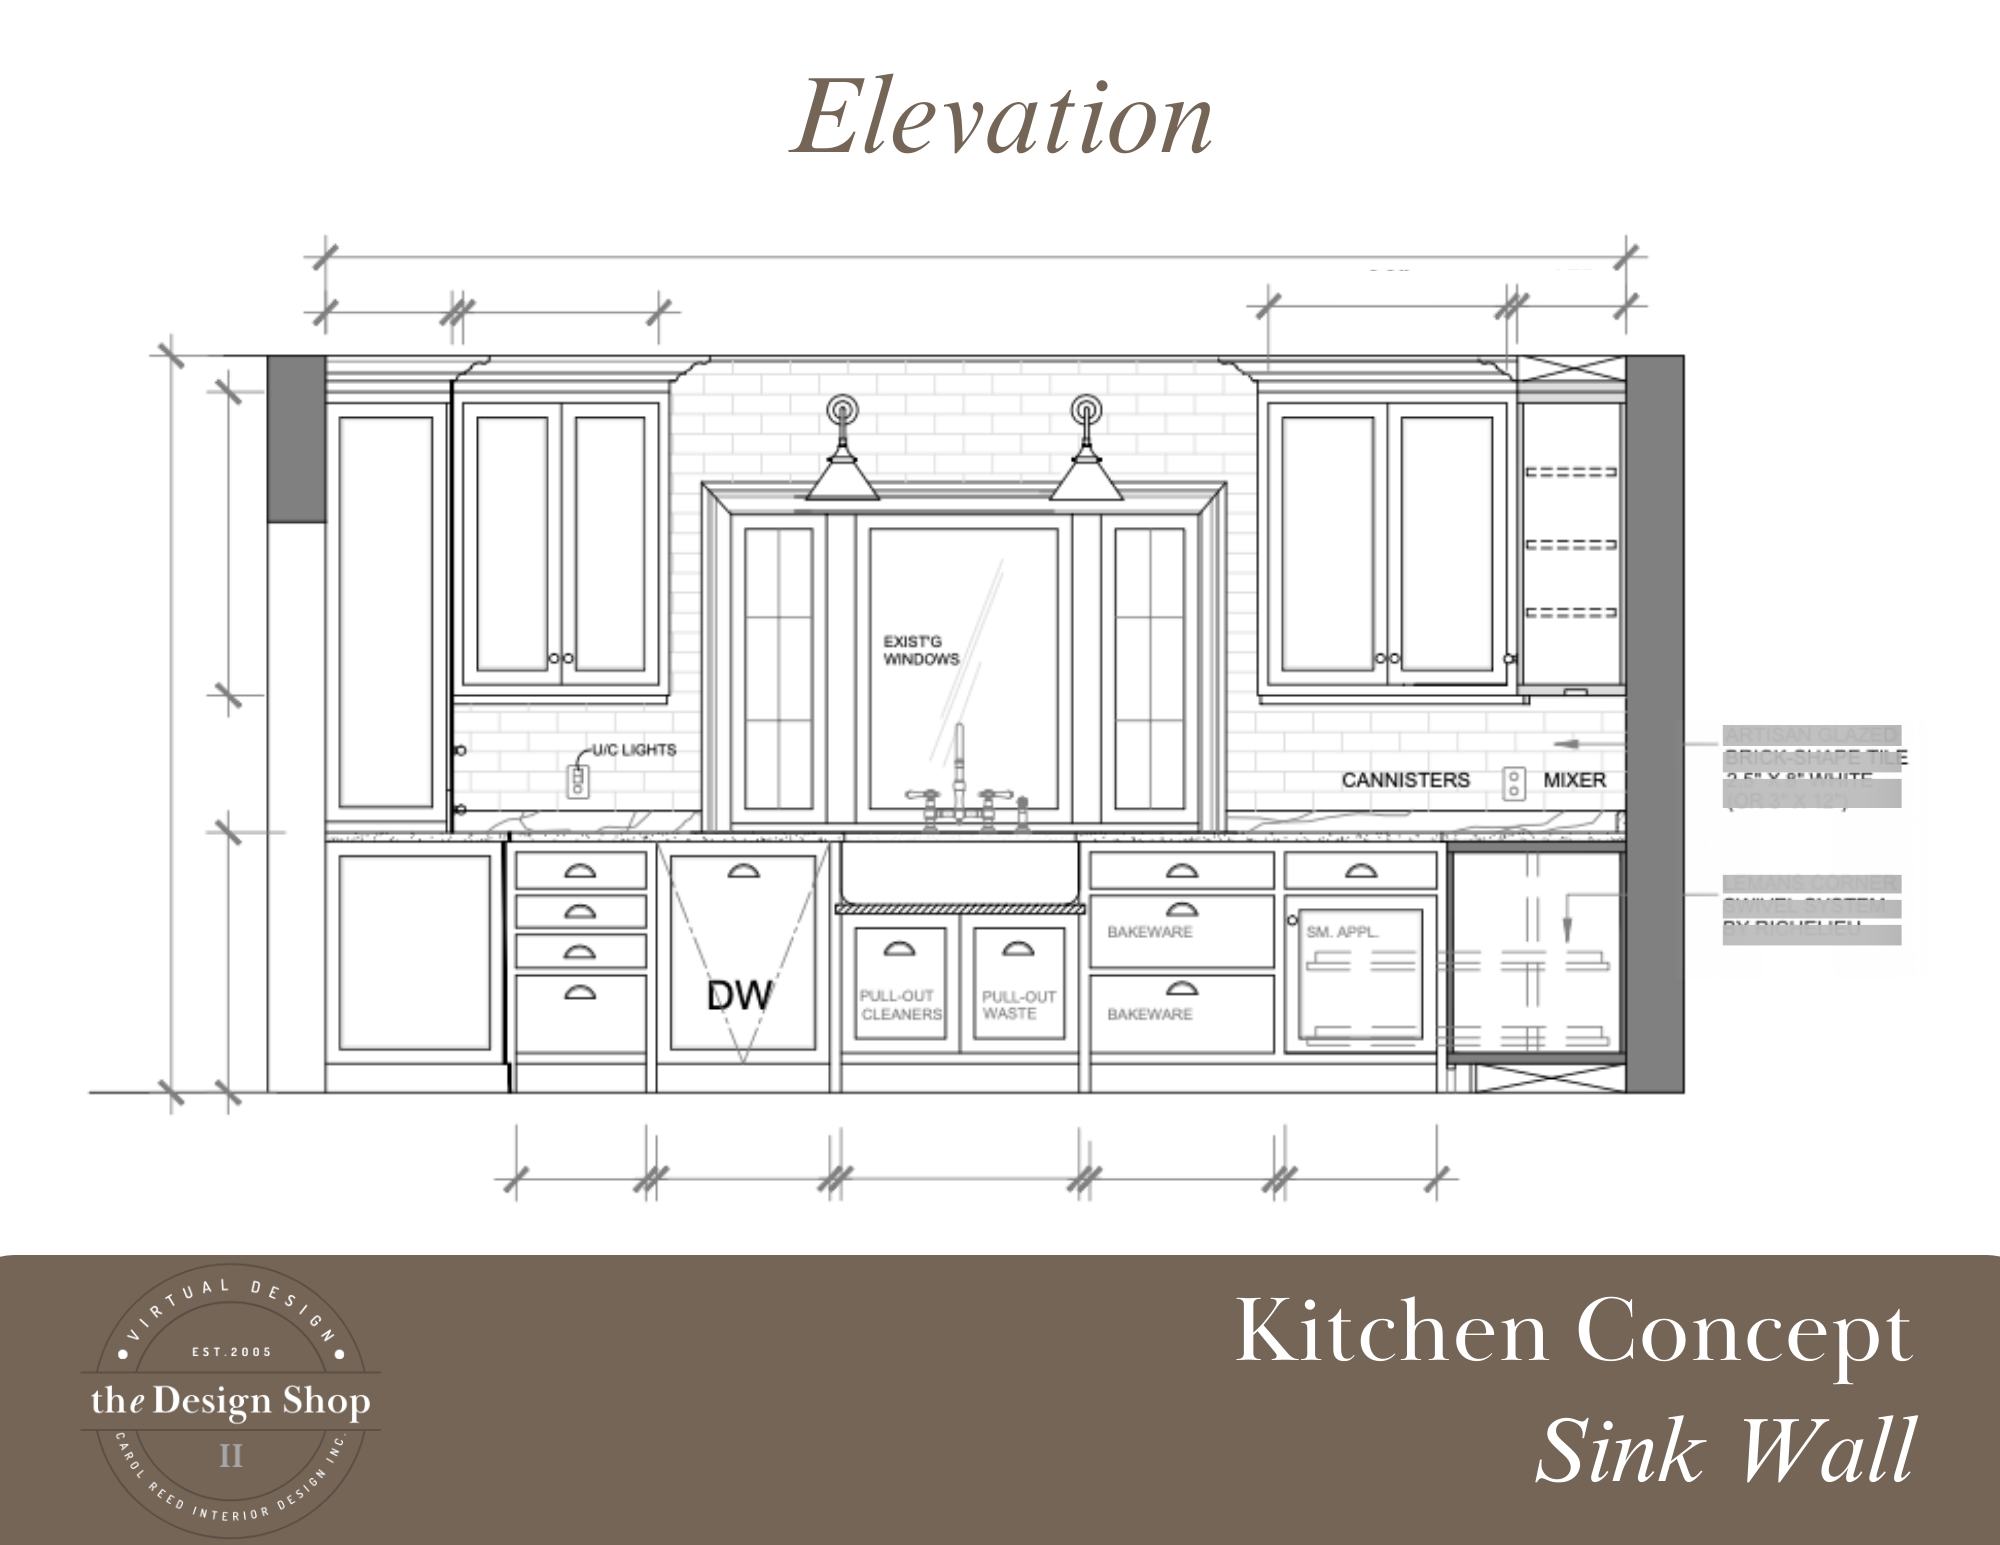
Building out a new interior can’t effectively be done from a floor plan alone, its crucial for the contractor, trades and installers to know how the details and materials are intended to be installed on each wall (and ceilings!), this is best illustrated by creating elevation views which depict the wall from floor to ceiling. Elevations are especially critical and a must have, for any wall that has custom cabinetry or millwork on it.
Below is a look at some elevations that we prepared for past online clients. As you look at these you can see they relay a lot of aesthetic information, even while void of colour, the elevation illustrates where different materials are installed and where fixtures are located. All of these installation dimensions become critical information for each trade. (we’ve blanked out the specs for sharing purposes).
PLAN & PREPARE ELEVATIONS TO AVOID COSTLY MISHAPS
The process of drawing out the design in elevation view helps avoid conflicts - for example, the electrician will know not to put an outlet where a mirror is going. As you can see, we can’t prepare elevations without also considering what type of materials, trim, style of cabinetry or fixtures would be used, which is why anytime we provide elevations to clients this will include those in general concept. Taking it a step further when we’re also hired to source and pull together all those selections the elevations can be more complete with exact dimensions to ensure proper spacial placement and function.
ELEVATIONS And MATERIAL & FIXTURE SELECTIONS
In order to provide installation dimensions and material locations to the contractor - the type of material, exact light fixture, faucet and moulding/trim sizes need to be known first., ie; all wall sconces are not the same shape or size, so their installation height will vary. Initially before fixtures are 100% finalized or ordered we develop elevation concepts, and then for a more complete picture we can include specific final selections. Our process of proposing a concept or selecting materials and fixtures is never just random, or starting blindly - a Floor Plan Layout provides the physical parameters and a Vision Board depicts the desired aesthetic style of the new space, so that’s a whole lof of direction to work with.
FROM VISION BOARD TO DESIGN DETAILS
As a designer, its when we’re visualizing the wall vertically that we begin to apply materiality and details, but this isn’t done randomly. Before beginning the process of developing elevations we’ve already searched and gathered inspiration for the proposed materials and fixtures. The point of reference for those elements is the inspiration images on the Vision Board. Taking direction from the look and feel of that vision, we incorporate the same or similar elements from those images into the elevation design - is there wall panelling?, shelf brackets?, symmetrical sconces? or a range hood detail that the client is dreaming of? Working with the exact dimensions of the room and walls, we begin to plan out how all of these elements can come together in the given space.
Here’s an example of a Vision Board and below that, the design solutions applied to an ensuite design, this shows where we started and where we ended up.
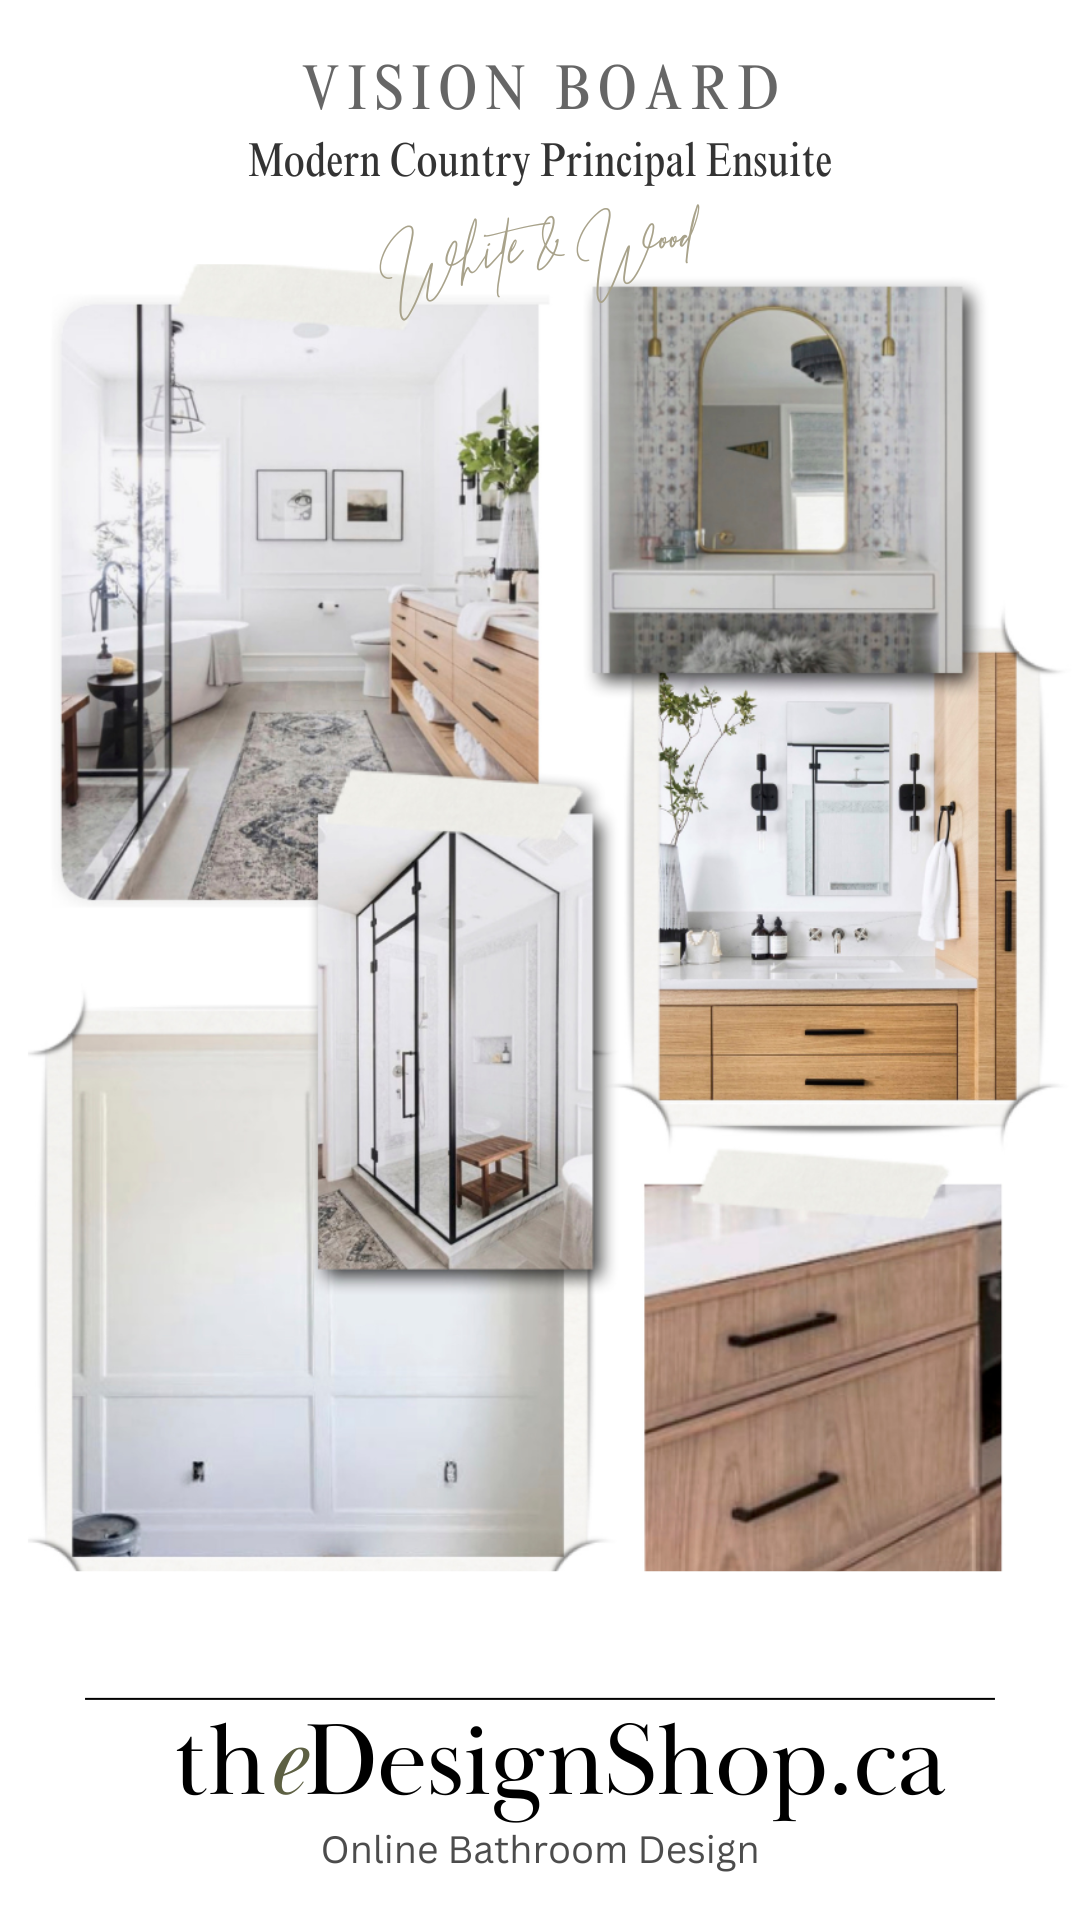
Before we start drawing up elevations for a project we’ve typically already determined a direction for the material colour palette and pulled together some inspiration for plumbing, light fixtures and tiles. You’ll see how similar elements from the vision board above are incorporated in the elevation design concept below. The elevation concept illustrates what size, type, shape, and spacing we are recommending for the various elements as well as where they’d be placed.
APPLYING DESIGN TO WALL ELEVATIONS
Additionally while preparing elevations of a wall various design principles come in to play and are used to emphasize line, create balance, design a feature detail and resolve challenges like odd jogs in a wall or an off centre window.
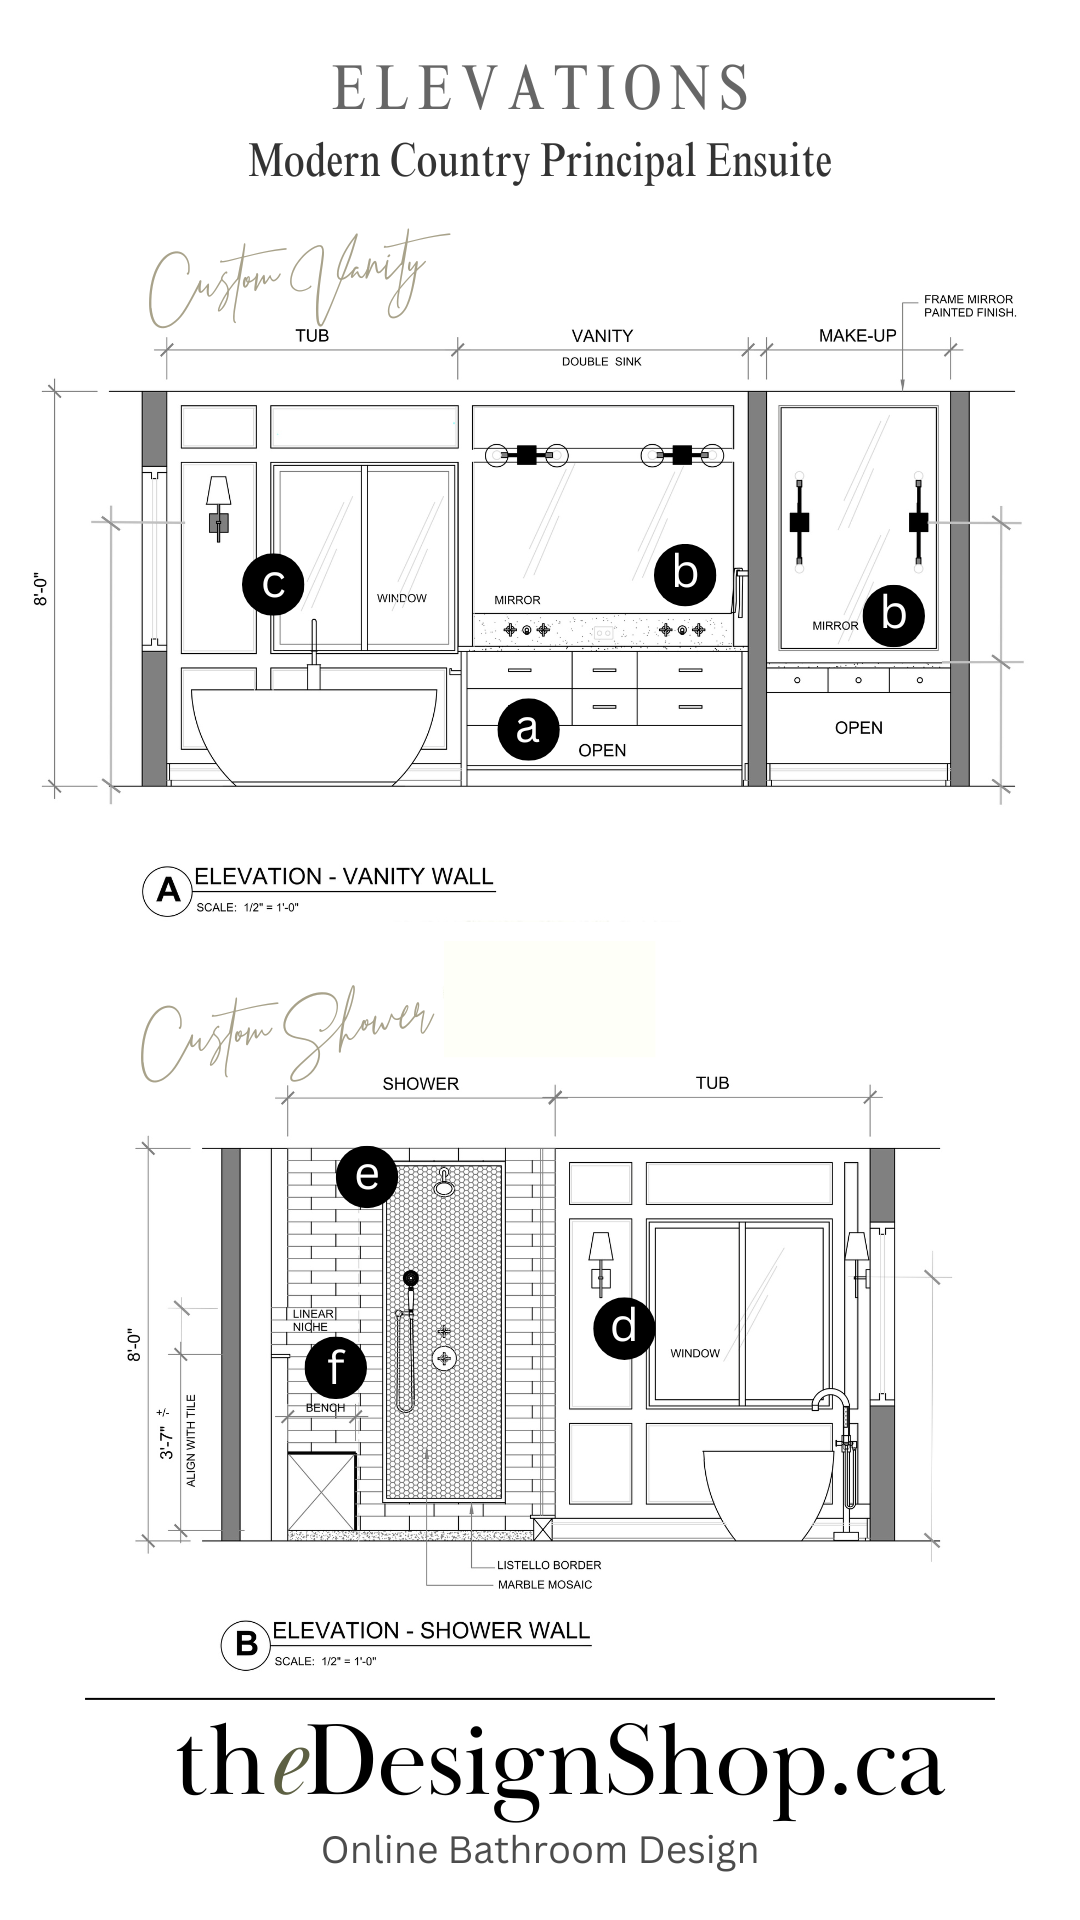
A) Vanity Design
B) Created a custom floating makeup vanity in a nook, repeating mirror detail from the vanity
C) Designed a wall panelling treatment to integrate the window casing with vanity mirror, resolving issue of window casing overlapping the vanity
D) Designed wall panelling treatment to balance the off-centre window while at the same time creating symmetry by duplicating the panelling design on the adjacent wall, and centring a pair of accent wall sconces in a panel. Asymmetry and symmetry at the time.
E) Created a tile inlay detail by mixing two different sizes/shapes of the same tile
F) Created a custom soap niche and bench in a recessed nook of the shower
WHY CONTRACTORS DON’T BUILD FROM PHOTOS
One of the issues people run into if designing a space themselves and they don’t have any design drawings is that just showing a contractor inspiration photos from Pinterest or a magazine won’t provide the most crucial information needed - the sizes, the spacing and placement dimensions - this info is what makes the installation functional and aesthetically well designed. A photo is a great reference for the end goal but you still need to figure out all the sizes and spacing and source the materials and fixtures. Coincidentally lack of dimensions and specs is one of the biggest issues with AI generated design concepts, there’s no control or info for dimensions, materials and products.
Here’s an example of 13 common installation details that are reflected in a typical kitchen design Elevation:
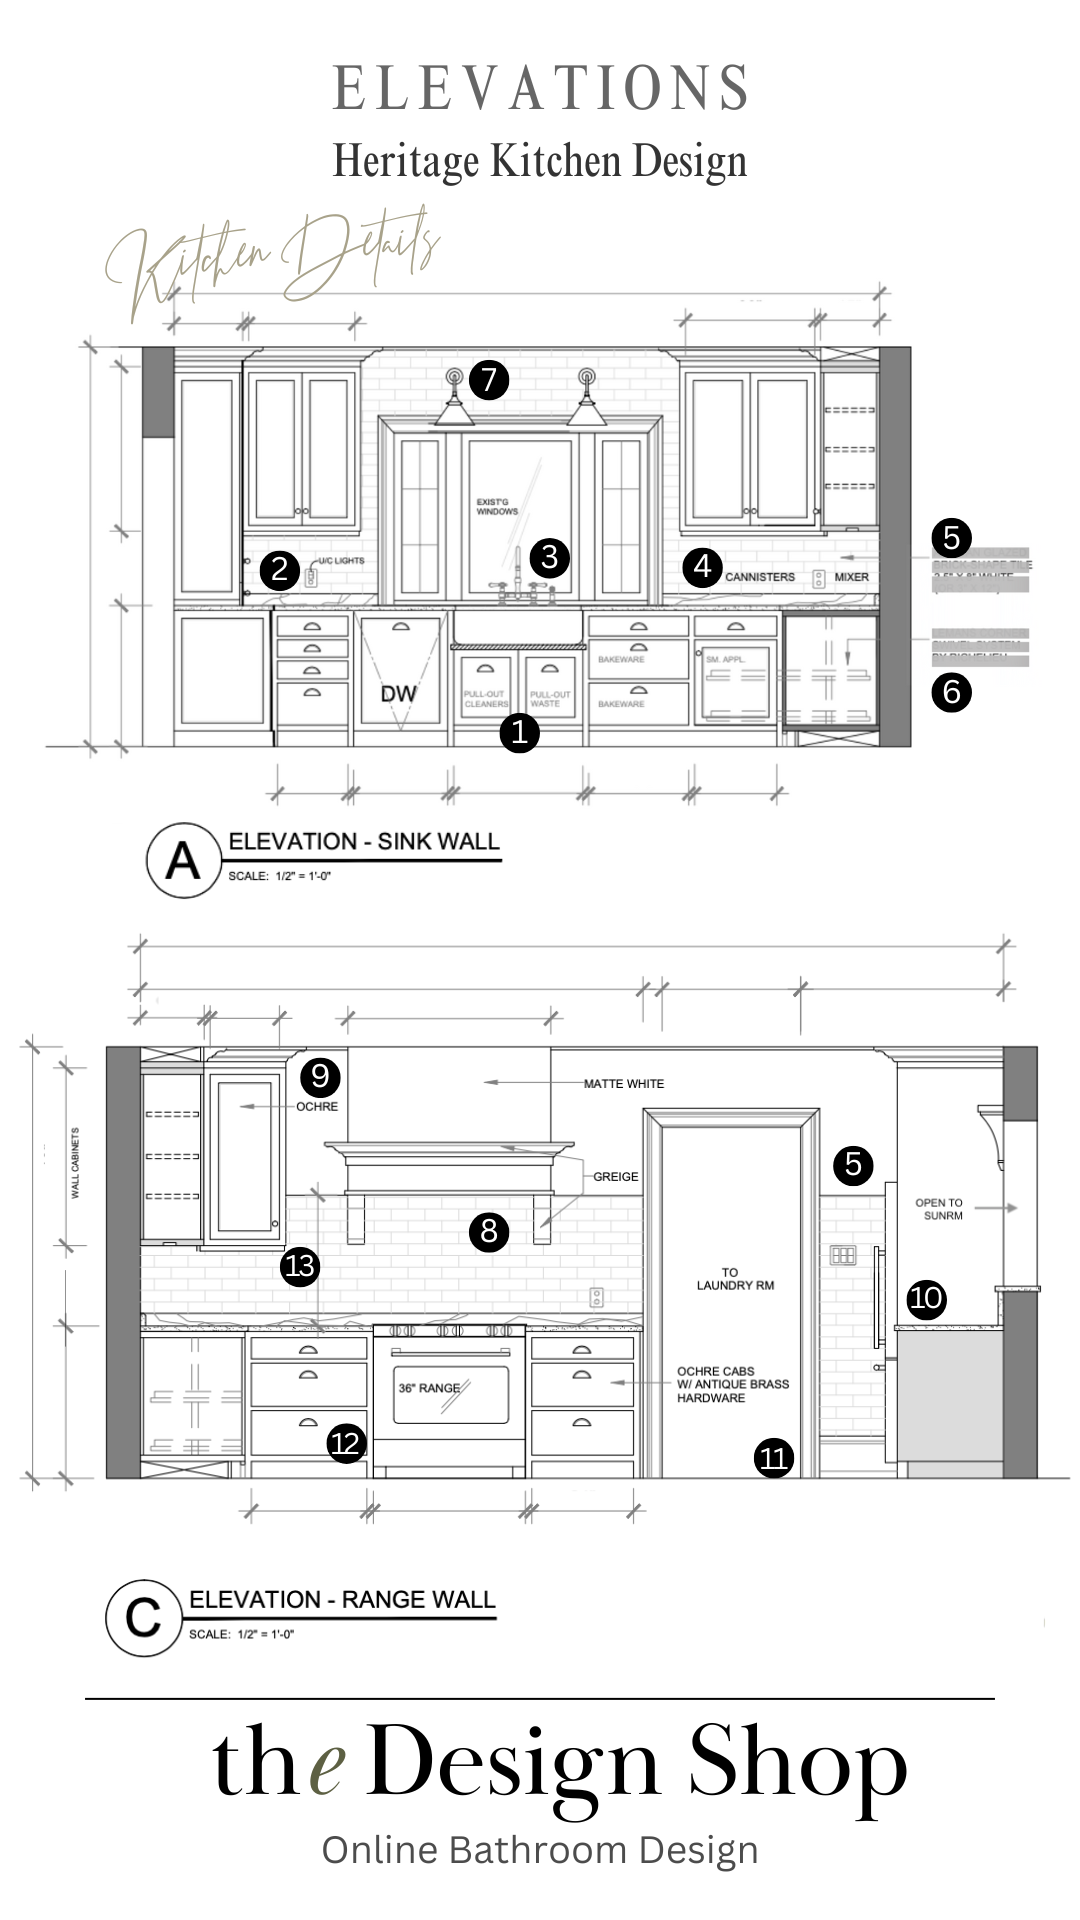
All of the information below is inidicated in these elevation drawings and notations (some of have been blanked out for public sharing).
) Cabinetry Design/Style
) Cabinetry configuration and cabinetry sizing
) Plumbing fixture types and integration
) Electrical outlet locations
) Backsplash material and heights
) Blind corner details
) Wall light locations
) Range hood type and design
) Cabinet ceiling trim
) Appliance integration
) Trim work size and application
) Hardware type and placement
) Cabinetry and built-in installation heights
I’ve learned early on in designing interiors there’s no other question I’m asked on site more often than “what height do you want this at” if it’s not shown on an elevation - and exact fractions of inches matter. Anything that can go wrong on a job site or installation will almost always be a result of an incorrect elevation dimension. The contractor, the plumber, the electrician, the tiler,,,, the painter, the trim carpenter, the cabinet maker,,,, every one of these individuals will potentially be working on the same wall so its critical for each to know exactly where everything is to be installed. If you don’t have this information drawn up (and taped to each wall as I typically do) you’ll have to be there and verbally give them dimensions on site, including marking it out on the actual wall. If you have to do this for an entire project you’ll practically have to be there full time. Preparing these elevations ahead is the most efficient method for sharing the information and reduces the risks of miscommunication and mistakes.
ELEVATIONS DESIGNED FOR YOU
For your upcoming remodelling project or new build be sure to consider who’ll prepare the necessary elevations for your review/approval and for your contractor. Plan to have them done well before construction starts. I also even recommend drawing up elevations (by hand or other method) for DIY projects as its the only way to ensure you don’t overlook anything or compromise the design intent. I promise everything that can go wrong with an installation will almost always be a result of something being installed/built at the wrong height or position. It’s happened in my own house when I’ve not been there to give direction or didn’t leave a sketch beforehand. When you realize after the fact something’s been installed at the wrong height there’s a snowball effect and the consequences can be quite unravelling and costly to fix. Or, you live with the mistake and it becomes a daily reminder of how important it is to manage the details.
We offer elevations as part of our kitchen and bathroom packages No.1 & 2, so you don’t have to figure this out on your own or at the last minute. Our packaged design plans will ensure you can be fully design ready for your cabinet maker and contractor.
Learn More Below!
Connect with Carol on Social:
For more insights on home design, what we’re working on around the house, on the job site, and favourite finds!

Blog Author
Carol Reed |InteriorDesigner
Carol has been a practicing Interior Designer for over 28 years, focusing on residential interiors since 2005 as Principal of Carol Reed Interior Design Inc. Her work has been featured in Canadian House & Home, Style at Home and Canadian Home Trends magazines among others and frequently contributes as a design expert for their various editorial content. Honoured to be included in House & Home Magazines Top 100 Canadian Designers list.